
If you’re looking for a fun backyard game, building your own DIY cornhole boards is both rewarding and cost-effective. With just a few basic tools, plywood, and some patience, you can create regulation-size cornhole boards that will last for years. Follow this easy step-by-step guide to learn how to cut, assemble, and finish your custom cornhole set.
Materials You’ll Need
- Two 24″ x 48″ sheets of 3/4″ plywood
- 1×4 boards: (4) 48″ and (4) 22 1/2″
- 1×4 boards for support legs: (4) 11 1/2″
- Wood glue
- 1 1/4″ pocket hole screws
- Drill + drill bits
- Jigsaw or 6″ hole saw
- Sandpaper
- Bolts: 2″ long, at least 1/4″ in diameter
- Compass (or string + pencil)
- Stain or paint (semi-gloss recommended)
Step 1: Cut the Cornhole Tops
Start with two 24″ x 48″ sheets of 3/4″ plywood. You can buy these precut or cut them down from a full sheet yourself.
Step 2: Mark the Cornhole Holes
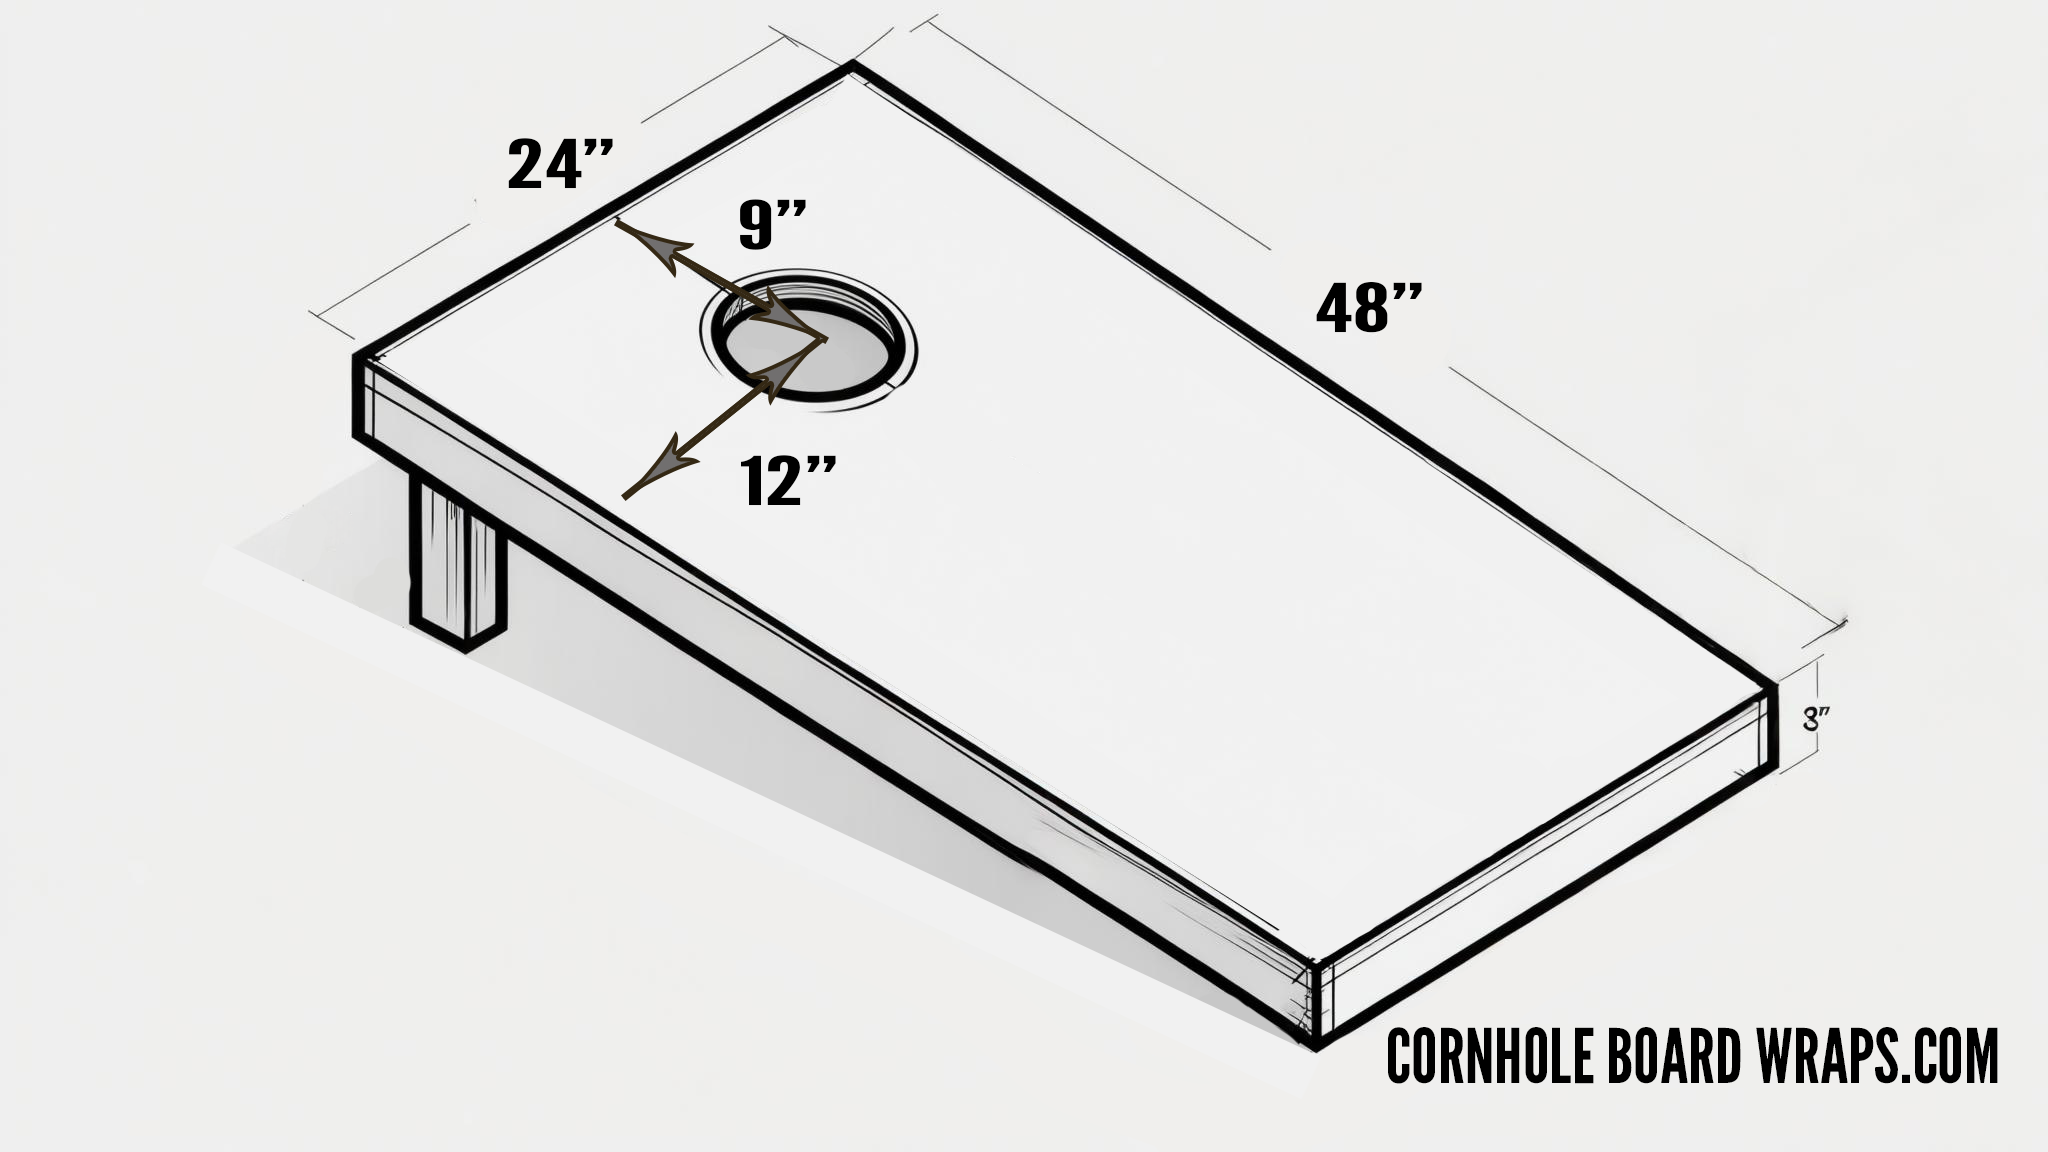
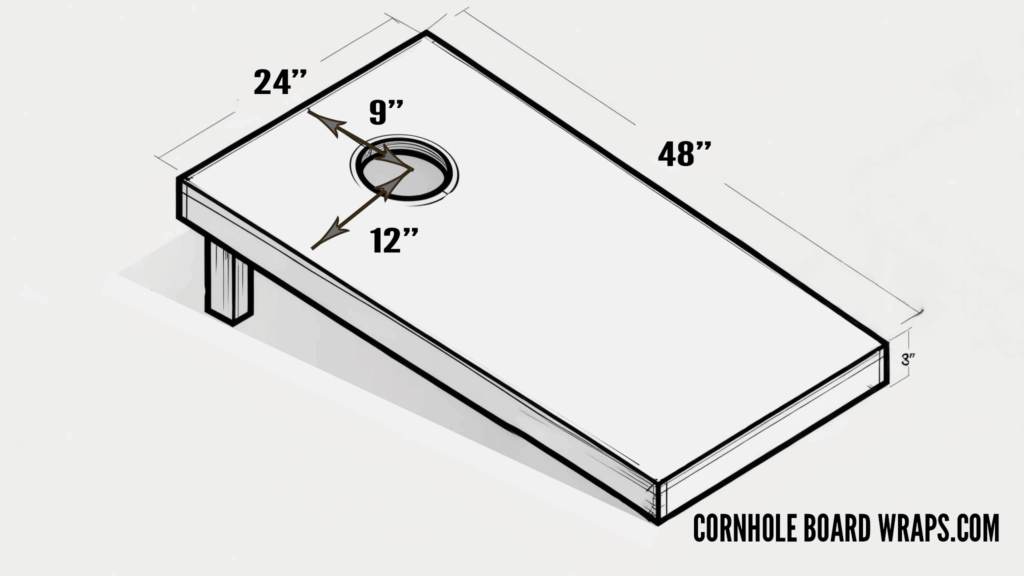
- Measure 9 inches from the top and 12 inches from the side of the plywood.
- Mark that point.
- Using a compass (or pencil and string method), draw a 6-inch diameter circle centered on that point.
Step 3: Cut the Cornhole Holes
- Use a 6-inch hole saw or a jigsaw to cut the circle.
- Pro Tip: Place painter’s tape over your cut line before sawing to prevent wood tear-out.
- Once cut, sand the circle edges smooth.
Step 4: Prepare the Frame
- Cut (4) 48″ 1×4 boards and (4) 22 1/2″ 1×4 boards.
- Drill pocket holes into the sides of each board, plus the ends of the 22 1/2″ boards.
Step 5: Assemble the Frame
- Apply wood glue to each corner.
- Use 1 1/4″ pocket hole screws to attach the frame boards together.
- Secure the plywood top to the frame with pocket hole screws from underneath.
Step 6: Cut the Support Legs
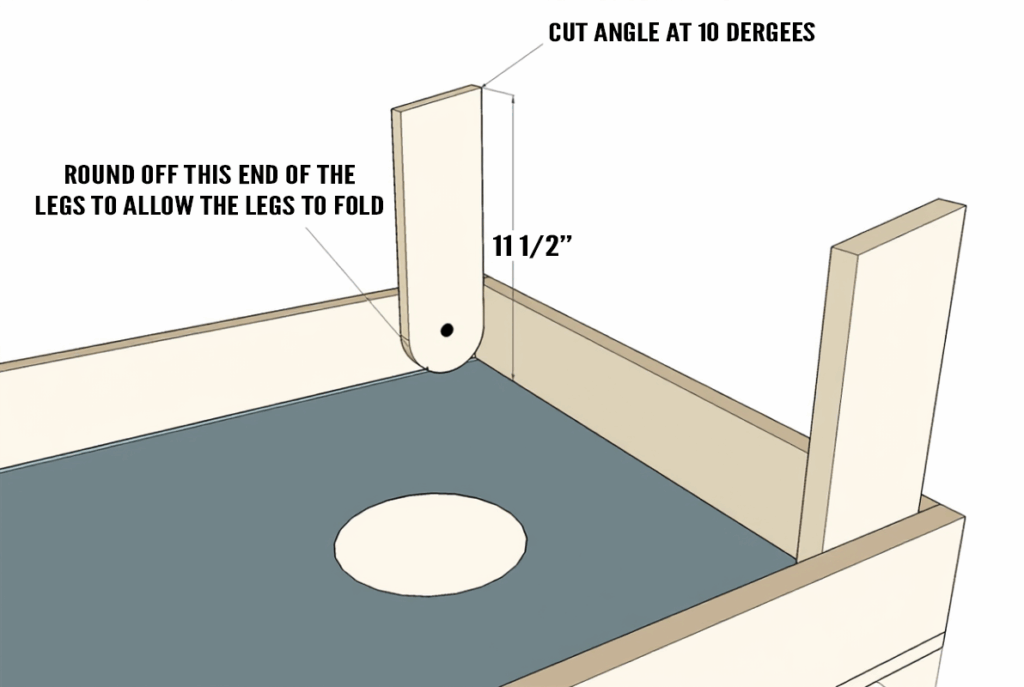
- Cut four 11 1/2″ boards for legs.
- Trim one end at a 10-degree angle to allow proper folding.
- Round off the bottoms to ensure smooth movement.
Step 7: Attach the Support Legs
- Clamp each support leg to the inside of the frame.
- Drill a hole 1 3/4″ from the side and bottom of the support board, drilling through both the leg and frame.
- Attach each leg with a 2-inch bolt (at least 1/4″ thick).
Step 8: Sand and Finish the Boards
- Test the legs to make sure they fold in and out easily.
- If they stick, sand the rounded edges until they swivel smoothly.
- Sand the entire board and apply your choice of stain or paint.
- ✅ For official play, use a semi-gloss finish for the perfect slide.
Step 9: Make or Buy Cornhole Bags
You’ll need 8 cornhole bags (4 for each team).
- DIY Sewing Option:
- Cut fabric squares 6.25″ x 6.25″.
- Sew with a 0.25″ seam on all sides.
- Fill each bag with 2 cups of feed corn.
- Finished bags should measure about 6″ square and weigh 14–16 ounces.
- Buy Pre-Made Bags:
- You can order durable cornhole bags online for convenience.
Final Thoughts
Building your own DIY cornhole boards is a simple woodworking project that provides endless entertainment for family and friends. Whether you’re preparing for backyard barbecues, tailgating, or just some weekend fun, this homemade cornhole set will give you lasting memories.
Next step: Personalize your cornhole boards with Cornhole Wraps, decals, or themed designs to make your game even more fun!
Wrapping a Cornhole Board: Step-by-Step Guide for a Perfect Finish
Cornhole is one of the most popular backyard games in the U.S., loved for its simplicity, fun, and competitive spirit. While building a set of cornhole boards is a rewarding project, many enthusiasts take it a step further by customizing their boards with vinyl wraps. Wrapping a cornhole board gives you a professional, polished look while also protecting the surface.
In this guide, we’ll walk you through why wrapping is better than painting, what materials you’ll need, and how to apply a cornhole board wrap like a pro.
Why Wrap a Cornhole Board Instead of Painting?
Painting cornhole boards has always been a traditional way to decorate them, but vinyl wraps are quickly becoming the preferred method.
Benefits of Wrapping
- Durability: Vinyl wraps are resistant to scratches, scuffs, and weather damage.
- Style Options: With countless designs, from sports teams to rustic wood patterns, wraps offer unmatched customization.
- Easy to Apply: Even beginners can achieve professional results with vinyl.
- Less Mess: Unlike paint, vinyl requires no drying time or fumes.
Vinyl Wraps vs. Painted Finishes
| Feature | Vinyl Wrap | Painted Finish |
|---|---|---|
| Durability | High (lasts years with care) | Medium (prone to scratches) |
| Customization | Unlimited designs, full-color graphics | Limited to paint colors and stencils |
| Application Time | Fast (1–2 hours) | Slow (multiple coats and drying time) |
| Cost | Moderate ($40–$80 per set) | Low to moderate |
Tools and Materials Needed for Wrapping a Cornhole Board
Before starting, make sure you have the right tools on hand.
Choosing the Right Vinyl Wrap
- Outdoor-grade vinyl: Look for durable, weather-resistant vinyl with UV protection.
- Pre-cut wraps: Many retailers sell wraps sized exactly for regulation boards (24″ x 48″).
- Custom graphics: You can order personalized designs from online shops or local print shops.
Essential Tools
- Squeegee or credit card (for smoothing)
- Utility knife or precision blade
- Tape measure and straightedge
- Heat gun or hair dryer (to help with adhesion)
Optional Accessories
- Transfer tape (for alignment)
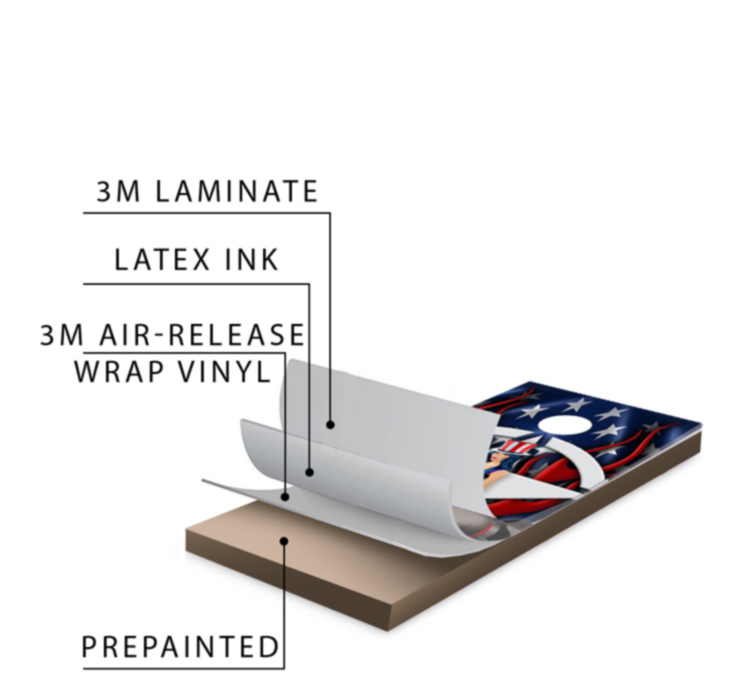
- Clear coat spray or laminate film (extra protection)
Preparing Your Cornhole Board for Wrapping
A flawless wrap starts with preparation.
Sanding the Surface
Lightly sand the board with 220-grit sandpaper to remove imperfections. This ensures the vinyl sticks evenly.
Cleaning the Board
Wipe the surface with rubbing alcohol or a mild cleaner. Dust or grease can cause bubbling.
Painting the Board
Wraps stick better to painted surfaces
Let paint dry before wrapping
Measuring and Cutting
Pre-cut your wrap to 25″ x 49″ to leave an extra margin around the edges.
Step-by-Step Process of Wrapping a Cornhole Board
Step 1: Positioning the Vinyl
Lay the vinyl sheet over the board, making sure the hole aligns properly. Use masking tape to secure one side.
Step 2: Applying the Wrap
Peel back a few inches of the backing paper and press the vinyl down. Work slowly, smoothing with a squeegee to push out air bubbles.
Step 3: Cutting Out the Hole and Edges
Use a utility knife to carefully cut around the cornhole opening. Trim excess vinyl along the edges for a clean finish.
Step 4: Sealing the Wrap
Use a heat gun to gently warm the vinyl, which improves adhesion. Apply pressure along the edges to seal them.
Design Ideas and Customization Options
- Hobbies: Support your favorite activities.
- Patriotic Themes: Fourth of July flags, State designs, Military wraps.
- Weddings & Events: Personalized wraps with names, dates, or monograms.
Common Mistakes to Avoid
- Stretching vinyl too much → causes warping.
- Not cleaning the board → leads to peeling.
- Skipping heat sealing → shortens wrap life.
Maintenance Tips
- Wipe down with a damp cloth after games.
- Store boards indoors when not in use.
- Rewrap worn areas instead of replacing the whole set.
Cost of Wrapping a Cornhole Board
- DIY wrapping kits: $40–$80 (pair of boards).
- Professional wrapping: $150–$300 depending on design.
Where to Buy Cornhole Wraps
- Online: Cornholewraps.com, and custom vinyl wrap shops.
Frequently Asked Questions (FAQs)
Q1: How long does a cornhole board wrap last?
A quality vinyl wrap can last 3–5 years with proper care.
Q2: Can I apply a wrap over a painted board?
Yes, but the surface must be smooth and clean for best adhesion.
Q3: Do I need to seal a vinyl wrap?
Not required, but sealing with a clear coat or laminate increases durability.
Q4: Can I remove or replace a cornhole wrap?
Yes, vinyl can be peeled off with heat. A new wrap can be applied afterward.
Q5: Are wraps regulation-legal in tournaments?
Yes, as long as the boards meet official dimensions (24″ x 48″).
Conclusion: Wrapping a Cornhole Board for Style and Durability
Wrapping a cornhole board is one of the best ways to upgrade your game set. Not only does it provide a durable, professional look, but it also opens endless customization possibilities. Whether you go with DIY wrapping or hire a professional, the results will make your cornhole set stand out at every barbecue, tailgate, or tournament.
Ready to upgrade? Grab a vinyl wrap, follow these steps, and enjoy a game-ready board with style.